#~Color Efex Pro
Explore tagged Tumblr posts
Visit Tumblr Blog
Explore Tumblr blogs with no restrictions, modern design and the best experience.
Last Seen Tumblr Blogs


Fun Fact
Celebrities use Tumblr as well.
Video
Wandergebiet Jenner (HDR). by Wim Jacobs Via Flickr: Zomervakantie Bergtesgaden. Tussenstop heenreis Hilpoltstein, terugreis via Aschaffenburg. Jennerbahn wandeling van Bergstation naar Mittelstation.
#Nikon D7200#Nikon#D7200#zomervakantie#Bergtesgaden#Beieren#Duitsland#Germany#AF-S DX 16-80mm f/2.8-4E ED VR#Jennerbahn#Jenner#Wandergebiet Jenner#wandergebiet#wandelen#hiking#HDR#high dynamic rage#NIK Color Efex Pro 4#FBpage#pint#500px#flickr
0 notes
Text
My ON1 Photo Workflow for Landscape Photos
These are my step-by-step choices and reasoning behind making very realistic photos that make the viewer feel like they are looking at a real scene and actually there, not looking at a photo, using ON1 photo software. Continue reading My ON1 Photo Workflow for Landscape Photos

View On WordPress
1 note
·
View note
Text
No 130 Adelaide St Canvas Prints by The Learning Curve Photography on Amazon. Constructed in 1979, No 130 Adelaide St W is a 33 floor office tower in heart of The Financial District of downtown Toronto Canada. Original photography using a Canon EOS 60D body with a Sigma 17-70mm f2.8 DC Macro OS lens and Silver EFEX Pro as a Lightroom plugin for the Black and White conversion. • 100% premium canvas ensuring longer lifespan and durability. • Protected with UV scratch-resistant and waterproof laminates. • Ready-to-hang. Supplied with hanging hardware. No additional hardware needed. • 30 Day Money Back Guarantee. #canvasprints #amazon #prints #wallart #toronto #blackandwhitephotography #originalphotography #photography #architecture
0 notes
Text
The Art of Jewelry Photo Retouching
Jewelry photo retouching is a meticulous art form that breathes life into jewelry images, transforming them from good to truly extraordinary. This process requires careful attention to detail, a deep understanding of aesthetics, and mastery over editing tools to bring out the brilliance, color, and beauty of each piece. Whether you're a jewelry photographer, retoucher, or business owner, understanding the art of jewelry photo retouching can elevate your visual content and engage your audience. Let's explore the essential elements of this specialized art form.
Understanding the Importance of Jewelry Photo Retouching
Jewelry retouching is essential to showcasing jewelry pieces at their best. Often, images straight from the camera don't fully capture the sparkle or intricate details due to various factors like lighting, reflections, and background distractions. Through retouching, you can highlight the essential elements of jewelry pieces, from diamonds to metals, making them visually appealing.
Boosting Brand Image and Sales
Quality images play a crucial role in online shopping, as buyers rely solely on visuals to make purchasing decisions. Retouched jewelry photos can significantly enhance a brand’s image, leading to increased trust and credibility among customers. When a product looks flawless, potential customers are more likely to make a purchase, directly impacting sales.
Essential Tools for Jewelry Photo Retouching
These two software are the industry standards for product photo retouching. Adobe Photoshop offers a wide range of tools, including the clone stamp, healing brush, and adjustment layers, to handle everything from background cleanup to intricate detailing. Adobe Lightroom, on the other hand, is excellent for basic adjustments like color correction, exposure, and contrast, making it a great starting point before moving on to Photoshop.

Specialized Plugins and Filters
To further enhance your jewelry images, consider using specialized plugins like PortraitPro and Color Efex Pro. These plugins add unique filters and adjustments, saving time and creating specific effects that can bring out the shine and sparkle in gemstones. With tools like Nik Collection or Topaz Labs, you can achieve professional-looking results with ease.
Techniques for Perfecting Jewelry Images
One of the first steps in jewelry retouching services background removal. A clean, solid-colored background enhances focus on the jewelry. After isolating the jewelry from the background, you can add subtle shadows or reflections to create a professional look. A neutral or white background is most commonly used to give the piece a high-end appearance.
Polishing Metal and Gemstones
Bringing out the natural shine in metals and gemstones is crucial in jewelry retouching. Techniques like the dodge and burn tool help highlight the metallic luster, while the clarity adjustment refines the sparkle of gemstones. This method can also correct imperfections or reduce unwanted reflections.
Enhancing Clarity and Sharpness
Jewelry pieces have small, intricate details that need to be sharp and clear. Focus stacking is a method that combines multiple images taken at different focal points to achieve maximum sharpness throughout the piece. This technique can be particularly effective in capturing fine details in macro jewelry photography.

Using the Sharpening Tool
Photoshop's sharpening tool, combined with high-pass filters, can accentuate the sharpness without introducing noise or grain. The goal is to strike a balance that keeps the jewelry image crisp while maintaining a natural look. Enhanced sharpness brings out details that draw viewers’ attention to the jewelry's craftsmanship.
Retouching Colors and Enhancing Gemstone Brilliance
Jewelry photography often requires color correction to make sure gemstones and metals look accurate and vibrant. Hue, saturation, and luminance (HSL) adjustments help in correcting color deviations and bringing out the authentic tones of each element. Color grading can also be applied to make images look polished and cohesive across a series.
Enhancing the Brilliance of Gemstones
To make gemstones look captivating, you can enhance their brightness and contrast. Using the dodge tool, gently lighten specific areas of the gemstone, creating the illusion of depth and luminosity. This technique helps in making gemstones look naturally brilliant and appealing to potential buyers.
Removing Imperfections and Unwanted Reflections
Dust, scratches, and minor imperfections on jewelry are common and can detract from the overall image quality. Using the spot healing brush and clone stamp in Photoshop, you can effectively remove these flaws. This step ensures that the jewelry looks flawless, increasing its appeal.
Eliminating Reflections and Fingerprints
Reflections, especially on polished metal surfaces, are inevitable in jewelry photography. Advanced retouching techniques, like frequency separation, help to smooth out unwanted reflections without losing texture. By eliminating distractions like fingerprints, the jewelry’s brilliance shines through.
Adding Shine and Gloss to Metal and Diamonds
Highlighting specific parts of the jewelry piece can add depth and make it look three-dimensional. Using Photoshop’s brush tool, you can create subtle highlights and shadows that give the piece a natural shine. This method can make metals look more polished and diamonds appear radiant.
Using the Blur and Glow Effects
For certain gemstones, adding a slight glow effect can enhance their natural sparkle. The blur tool can be applied subtly to areas around diamonds, creating an aura effect. This adds to the overall allure of the jewelry and makes it look more luxurious.
Adjusting Contrast and Brightness for Perfect Lighting
Proper exposure ensures that every part of the jewelry is visible. Underexposed areas may lose detail, while overexposed areas can appear flat. By adjusting brightness and exposure, you can bring out the true colors and textures of jewelry. This balance is essential for making images look professional and eye-catching.
Controlling Highlights and Shadows
Adjusting the highlights and shadows can help create a more balanced and appealing image. Too much brightness can make certain elements lose detail, while dark shadows can hide key features. By fine-tuning these aspects, jewelry pieces look both realistic and stunningly detailed.
Final Touches: Polishing the Overall Image
Once all the adjustments are complete, the final step is to crop and resize the image for different platforms, such as e-commerce websites or social media. Maintaining a consistent aspect ratio ensures that all images fit perfectly in various layouts, giving a cohesive look across digital platforms.
Applying a Subtle Vignette Effect
A soft vignette effect can be applied to draw the viewer’s eye to the center of the image, where the jewelry is positioned. By darkening the edges slightly, the focus remains on the jewelry, enhancing its visual impact without being overly distracting.
Optimizing for SEO: Making Jewelry Images Search-Friendly
To make jewelry photos SEO-friendly, add descriptive alt text and image titles. These should include relevant keywords that reflect the jewelry type, gemstone, or style. This not only helps search engines understand the content but also increases the chances of your images appearing in search results.
Compressing Images for Faster Load Time
Image size is an important factor for website performance. Compressing images without losing quality ensures faster load times, which improves user experience and can positively impact SEO. Tools like TinyPNG or ImageOptim can help achieve this balance.
Conclusion
Jewelry photo retouching combines technical skills with a keen eye for aesthetics to produce captivating images that attract customers and drive sales. Mastering these techniques, from enhancing clarity to creating realistic shine, can make a noticeable difference in how jewelry pieces are perceived. As you refine your skills, remember that patience and practice are essential. Each jewelry piece has its unique qualities, and with the right tools and techniques, you can bring out the best in every shot.
1 note
·
View note
Video
Maintenance Problems by Scott Gitlin Via Flickr: Color eFex Pro: nostalgic film. Fort Tilden, Riis Park, Rockaway Beach, New York
#Canon G9#New York#Riis Park#Rockaway#EssGee#emotive#Fort Tilden#Gateway National Recreation Area#tourist#travel#flickr
1 note
·
View note
Video
Urabandai: Sunrise on Lake Hibara by Shinichiro Saka Via Flickr: 裏磐梯 桧原湖
#耶麻郡#福島県#日本#20211129-IMG_7523-Edit#2021#crazyshin#Apple iPhone 12 Pro Max#iPhone#november#autumn#fukushima#japan#jp#nik#color efex pro4#51763128675#23035339#202112esp
46 notes
·
View notes
Text

Summer classic
xt4+af 33 mm 1.4 - nik xollection
color efex pro
These are the words of your grandmother. But the baby is hungry, let's have a light snack.
#food#ice cream#milk#chocolate#fujifilm#viltrox#teaspoon#glass#sweet#snack#hungry#light snack#maybe not#nik collection#dxo#color efex pro
5 notes
·
View notes
Video

flickr
Almbachklamm, Theresienklause (HDR). by Wim Jacobs Via Flickr: Zomervakantie Berchtesgaden. Tussenstop heenreis Hilpoltstein, terugreis via Aschaffenburg. Almbachklamm - Ettenberg.
#Nikon D7200#Nikon#D7200#zomervakantie#Beieren#Duitsland#Germany#AF-S DX 16-80mm f/2.8-4E ED VR#Berchtesgaden#klamm#kloof#high dynamic rage#HDR#NIK Color Efex Pro 4#FBpage#pint#500px#flickr
0 notes
Photo
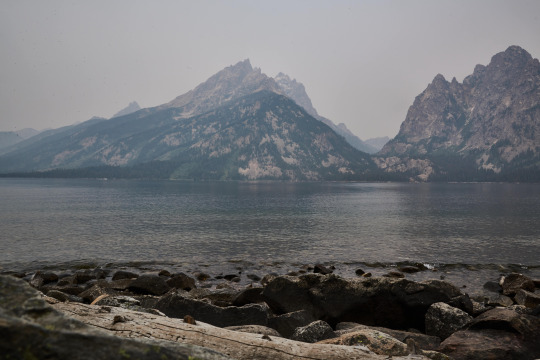
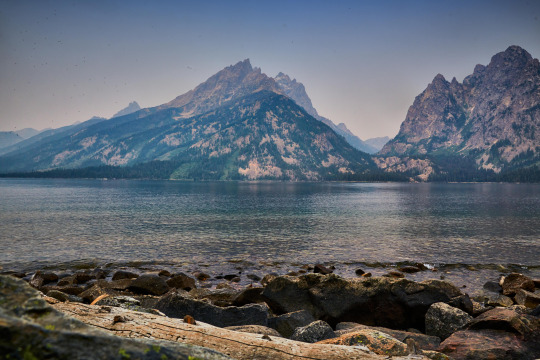
I had the great good fortune to visit one of the most beautiful places on earth... Grand Tetons National Park... sadly, the park was in a poor quality air alert the whole time because of wildfires in neighboring states... the mountains were shrouded with a haze that is both normal but exacerbated by the smoke drifting through atmosphere... these shots above were taken from the shoreline of Jenny Lake with a Nikon 810/28-78 zoom lens in manual mode... I shot them early, early in the morning as the sun was coming up behind my back... I used Capture One 20 and Nik Color Efex Pro to pull the details from the haze... also need to clean my sensor as I had some ugly artifacts show up that I had to heal away...
5 notes
·
View notes
Text
Phone Booth VI Canvas Prints by The Learning Curve Photography on Amazon. From an ongoing series of Black and White photos exploring a now outdated and almost forgotten technology in and around the Toronto Canada area. Original photography using a Canon EOS 60D body with a Sigma 17-70mm f2.8 DC Macro OS lens and Silver EFEX Pro as a Lightroom plugin for the Black and White conversion. • 100% premium canvas ensuring longer lifespan and durability. • Protected with UV scratch-resistant and waterproof laminates. • Ready-to-hang. Supplied with hanging hardware. No additional hardware needed. • 30 Day Money Back Guarantee. #canvasprints #amazon #prints #wallart #toronto #blackandwhitephotography #photography #telephone
0 notes
Video
Buntwaschmittel by Pascal Volk
#Buntwaschmittel#Colorwaschmittel#washing powder#laundry detergent#Waschmittel#Macro#Makro#100mm#Close up#Nahaufnahme#Macro Dreams#bokeh#DoF#depth of field#Canon EOS 6D#Canon EF 100mm f/2.8L Macro IS USM#DxO PhotoLab#DxO Color Efex Pro#Nik Collection
1 note
·
View note
Video

flickr
#Mountains#Lake Reflections#Lake#Arête#Balcony View#Blue Skies#Color Efex Pro#Day 13#Glacier National Park#Glass Reflections#Grinnell Point#Reflections on Water#Lewis Range#Looking SW#Continental Divide#Mount Wilbur#Mount Gould#Swiftcurrent Lake#Nature#Nikon D800E#Portfolio#Project365#Sunrise#Trees#Water#Waterton Glacier International Peace Park#World Heritage Site#Art&Digital#Innamoramento#Water Reflections
34 notes
·
View notes
Video
Snake Charmed by Scott Gitlin Via Flickr: Color eFex Pro: nostalgic film 2. Riis Park, Rockaway Beach, New York
#Canon G9#New York#Riis Park#Rockaway#Beach#emotive#EssGee#Gateway National Recreation Area#tourist#travel#flickr
1 note
·
View note
Video

flickr
Finding My Next Adventure in Banff National Park by Mark Stevens Via Flickr: While at an overlook to Two Jack Lake and view to the south to the ridges and peaks of Mount Rundle off in the distance. This location is along the Lake Minnewanka Scenic Drive in Banff National Park. In composing this image, I walked around until I could find an opening in the trees that helped to frame the view with the lake waters and reflection as well as centering Mount Rundle in the upper portion of the image center. I felt this helped to create a layered look and add interests, from near to far.
#Alberta and Glacier National Park#Azimuth 176#Banff National Park#Blue Skies#Canadian Rockies#Color Efex Pro#Day 2#DxO PhotoLab 6 Edited#Evergreens#Forest#Forest Landscape#Glass-like Reflections#Hillside#Hillside of Trees#Hillsides#Lake#Lake Minnewanka Loop#Lake Minnewanka Scenic Drive#Lake Reflections on Water#Landscape#Landscape - Scenery#Looking South#Mountain Peak#Mountains#Mountains in Distance#Mountains off in Distance#Mountainside#Nature#Nikon D850#Outdoors
3 notes
·
View notes
Video

flickr
My Walking Day Dreams (Lassen Volcanic National Park) by Mark Stevens Via Flickr: While walking along the shores of Manzanita Lake and the namesake loop trail. The view is looking to the south-southeast across the lake waters with Lassen Peak as a distant backdrop. This is located in Lassen Volcanic National Park. In composing this image, I took advantage of the opening of trees along this section of the trail. I decided to angle my Nikon Z8 Mirrorless Camera slightly downward and bring the horizon a little higher into the image. I wanted to have Lassen Peak brought higher into the image, as I felt it would add a sense of grandeur, as well as minimizing what I felt was more of the negative space with the blue skies in the upper portion of the image. I did some initial post-processing work making adjustments to contrast, brightness and saturation in DxO PhotoLab 8. I then exported a TIFF image to Nik Color Efex Pro 7 where I added a Polarization, Foliage, and Pro Contrast filter for that last effect on the image captured.
#Azimuth 154#Blue Skies#California Cascades#Canvas#Cascade Range#Color Efex Pro#Day 1#DxO PhotoLab 8 Edited#Evergreen Trees#Evergreens#Forest#Forest Landscape#Glass-like Reflections#Lake#Lake Reflections on Water#Landscape#Landscape - Scenery#Lassen Peak#Lassen Peak Area#Lassen Volcanic National Park#Lassen Volcanic Shasta Napa#Looking SSE#Manzanita Lake#Manzanita Lake Loop#Manzanita Lake Trail#Mountain Peak#Mountains#Mountains in Distance#Mountains off in Distance#Mountainside
7 notes
·
View notes
Video
flickr
Finding My Next Adventure in Banff National Park by Mark Stevens Via Flickr: While at an overlook to Two Jack Lake and view to the south to the ridges and peaks of Mount Rundle off in the distance. This location is along the Lake Minnewanka Scenic Drive in Banff National Park. In composing this image, I walked around until I could find an opening in the trees that helped to frame the view with the lake waters and reflection as well as centering Mount Rundle in the upper portion of the image center. I felt this helped to create a layered look and add interests, from near to far.
#Alberta and Glacier National Park#Azimuth 176#Banff National Park#Blue Skies#Canadian Rockies#Color Efex Pro#Day 2#DxO PhotoLab 6 Edited#Evergreens#Forest#Forest Landscape#Glass-like Reflections#Hillside#Hillside of Trees#Hillsides#Lake#Lake Minnewanka Loop#Lake Minnewanka Scenic Drive#Lake Reflections on Water#Landscape#Landscape - Scenery#Looking South#Mountain Peak#Mountains#Mountains in Distance#Mountains off in Distance#Mountainside#Nature#Nikon D850#Outdoors
2 notes
·
View notes